Back in December of 2009, I purchased a “Famous Maker” refurbished 23″ monitor from Woot, which turned out to be an HP W2338 relabeled as a TSS TS-23W8H. The monitor has worked well and I have been very happy with the display for the past three years.
Recently, however, we attempted to switch over to another system on the KVM switch, heard a faint sizzling noise for a couple of seconds, and the power indicator changes back to amber with no display. My initial assumption was that the power supply had gone south, so we (and by we, I mean Nicole, because I’m usually on my laptop) used the iMac until I had a chance to disconnect the HP monitor and resurrect from storage the 19 1/2″ Acer that preceded it. Today, I finally dove in to the diagnosis and repair process.
Almost right out of the gate, I was thwarted in the disassembly process, leading me to cross reference the TSS part number on the monitor sticker to the original HP part number. Further searching led me to a YouTube video link on this page, showing that my assault from the rear of the monitor would be fruitless. The text within the video is in Spanish, but the information provided is clear and useful regardless.
[iframe src=”http://www.youtube.com/embed/A8XV4L0klO8″]
While the model numbers weren’t an exact match, this was clearly the same housing design. I was unable to duplicate the nonchalance with which the technician in the video removes the bezel from the front of the display, but finally got one corner to release after tugging much harder than I was reasonably comfortable with, after which the remaining edges followed easily. The video does a good job documenting the remainder of the disassembly process.
Removal of the main display encasement and disconnection of the associated cables proved relatively straightforward, and led to the realization that the monitor has built-in speakers. I had not looked closely enough at the connections previously to see the audio in jack. We may give these a try after the monitor is repaired and reassembled. After removing the outer panel containing the logic boards for the panel and inspecting the logic boards, I decided to continue on to examine the CCFL’s, as there was nothing visually obviously wrong with the inverter. Blown caps seem to be a common mode of failure for this monitor, and had any of them been swollen I probably would have looked into a replacement kit.

The back of the main LCD panel is labeled with a sticker indicating that it is a Samsung LTM230HT01 – which accounts for the quality of the picture; I have always been pleased with Samsung displays.
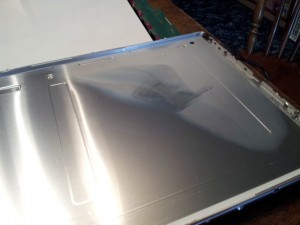
After removing the reflective metallic backing for the main LCD panel, it quickly became clear that my problem is most likely a broken CCFL tube. As you can see in the image at right, there is grayish-white residue distributed across the top right corner of the metal backing plate, characteristic of a fluorescent bulb that has broken but is still sufficiently closed to allow it to sputter and leak. I believe this residue is a combination of phosphorus and mercury that has escaped from the lamp during the few times we tried to get the monitor to kick on again. Handle with care!
Shortly after removing the back panel, my suspicions were finalized that this is indeed a CCFL problem. One of the tubes is cracked through and will require replacement.

There’s some good information in this thread about testing and replacement of the components. I’ve located a couple of potential sources for the CFLs, which are indicated to be 535mm (haven’t confirmed diameter yet)- Plazmo Industries out of Omaha on eBay, CFL Warehouse, and Backlight Company (who appear to stock both 3.0mm and 2.4mm diameter versions). I haven’t completely ruled out the idea of upgrading from CCFL to LED technology as suggested at lcdparts.net, though they don’t have anything of the correct size and the closest options to it appear prohibitively expensive. It would also be possible to build an LED strip or matrix myself, but my lack of familiarity with the best performing LEDs in this scenario (for brightness, whiteness, energy consumption, heat dissipation, and lifetime) lead me to avoid such an undertaking.
UPDATE 2012-11-20
Dug out my micrometer and measured in at ~5/64″, or approximately 2mm. I may have some further searching to do in order to locate a 2mm tube, as I don’t believe any of the ones I ran across previously were that diameter. Out of curiosity, I also measured the length, and it turned out to be about 20 1/4″, or approximately 515mm between the silicon caps… doesn’t match with what my other sources had indicated. It might be as much as 20 1/2″ or even 20 5/8″ inside the caps. Since they will need to come off anyway, I went ahead and peeled back the silicon caps. Unfortunately I destroyed one in the process… so that partially answers the question on # of CCFL’s to purchase as “at least two” since I will be removing the other one to replace the cap in any case. The most accurate measure I could come up with is 20 11/16″ from tube end to tube end, which equates to approximately 525mm. It also appears that they placed a small heat shrink boot over the connections at one end of the tubes, which is also a good idea.

