Hacks Archive

DIY Pin Lock Socket – Mr.Beer® Fans Forum

Posted January 25, 2014 By Landis V

http://www.mrbeerfans.com/ubbthreads/ubbthreads.php/topics/276496/DIY_Pin_Lock_Socket.html

DIY post/pin socket for pin lock kegs.

DIY post/pin socket for pin lock kegs.

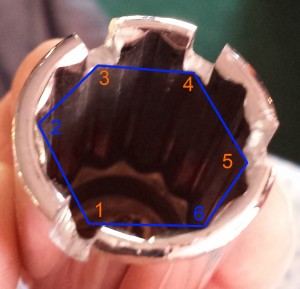
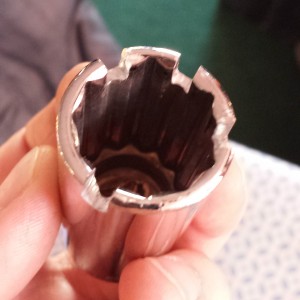
I was at Menards the other day and it crossed my mind that I needed make one of these so I could place the o-rings on my pin lock dip tubes.  I picked up a Mastercraft deep well 13/16″ socket, finally got around to cutting the slots in it today, and it works great.  My socket as it came out appears to the left, it took about 15 minutes with some very flimsy/lightweight cutoff wheels in my Dremel-like tool.

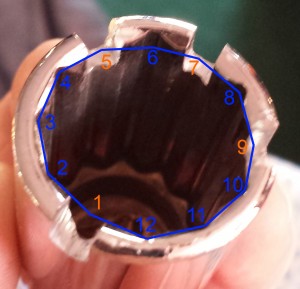
As I was looking at the picture, it occurred to me that it might save someone some time in the future if they could simply mark and cut rather than line up and mark the pins.  Pretty straightforward to do with either a six point or twelve point socket.  I’ve attached a couple of pictures below that show which of the points you’d need to cut for both a six and twelve point socket.

12pointsocketpinlock hexpinsocket

Be the first to comment

Revisiting the POGO-E02 for ownCloud and storage

Posted October 4, 2013 By Landis V

In a recent post, I reconfigured one of my POGO-E02 devices to run Linux (also in a much older post, but I intend to go back and revisit that device with the updated process at some point).  I have reccently replaced my laptop (OfficeMax had a pretty impressive flash sale on a Gateway with an AMD quad core, and huge kudos to the OfficeMax in Kearney, NE for taking care of the customer incredibly well when the one I initially picked up had a dead left mouse button and a dead F10 key out of the box… literally zero hassle getting it replaced, great job to that team).  Unfortunately the old laptop is still sitting on the desk next to the new one, soaking up space I don’t have.  I need to make sure I have everything I’ve done on it in the past year and a half or so saved off and duplicate backup copies, as there are a couple of videos I’ve stored on there that are simply irreplaceable.

Time to get back into storage.  I like my Dropbox (you should definitely sign up here if you don’t already have an account) and I recently got some additional temporary space when I bought my Samsung Galaxy S3, but my space is otherwise full and I won’t pay for more.  I think ownCloud, an older version of which I reference briefly in the second linked post above, will prove quite suitable for this, especially in conjunction with my personal CA.

I brought my Linux-ified Pogo back online and hooked up a Seagate external drive I’ve had sitting around and been meaning to hook up for quite a while.  I hooked it up to the Pogo unit and it was recognized as sdb.  From there, I performed the following (as root) to create two, 1TB partions on the drive:

apt-get install parted
#confirm installation when prompted
parted -a optimal /dev/sdb
rm 2
rm 1
mkpart
#Answer prompts with label=OwnCloud, type=ext4, start=0%, end=50%
mkpart
#Answer prompts with label=Storage, type=ext4, start=50%, end=100%
quit
mkfs.ext4 /dev/sdb1
#I only created the OwnCloud partition at this time in the interest of saving time.
#Perform a similar command for sdb2
mkdir /mnt/owncloud
#Should edit /etc/fstab and add a line similar to the following for perpetuity:
#/dev/sdb1 /mnt/owncloud ext4 rw,relatime,data=ordered 0 0
#I did, and then rebooted to make sure everything came up/remounted as expected

From there, I proceeded with the installation of ownCloud on Debian as per the instructions on the site.  I followed the link for Debian Linux, verified my version (cat /etc/debian_version) – I am on 7.1 so followed the 7.0 instructions with a few verifications.

echo 'deb http://download.opensuse.org/repositories/isv:ownCloud:community/Debian_7.0/ /' >> /etc/apt/sources.list.d/owncloud.list
apt-get update
#Received the following error here:
#W: GPG error: http://download.opensuse.org Release: The following signatures couldn't be verified because the public key is not available: NO_PUBKEY 977C43A8BA684223
#Added the following steps, per http://en.kioskea.net/faq/809-debian-apt-get-no-pubkey-gpg-error
gpg --keyserver pgpkeys.mit.edu --recv-key 977C43A8BA684223
gpg -a --export 977C43A8BA684223 | apt-key add -
#Reran update to verify
apt-get update
#Success! I then noticed they had an equivalent answer in the next step :/ Oh well.
apt-get install owncloud
#Accept dependencies

Once installation completed, I opened a browser to the owncloud URL on the Pogo at http://<pogo_ip>/owncloud.  Because I intend to make my access seamless whether I’m at home or connecting from the Internet at large, I have a few tricks I need to do yet.  But first I finished up the basic configuration.  I created my administrator account and password, hit the Advanced button and set my data directory to the /mnt/owncloud/data directory using the mountpoint I had created previously.  The database was set at SQLite, so I left it for the time being.  After submitting, I thought to check and found that there was an existing “data” directory in /var/www/owncloud with ownership www-data:www-data and ug+rwx, so I created a /mnt/owncloud/data directory with the same ownership and permissions.  After refreshing the initial page and setting the final config again, things seemed to load properly this time around.

I set up a WebDAV connection from the Dolphin file browser and started transferring some of the files from the Linux laptop per the user manual.  I experienced problems transferring a few of these files and remembered something about large file support, so I went back and took a look into that.  The default max size looks to be 800MB and I didn’t have anything beyond that, so I tried a reboot; it took a long time to complete, but it seemed to work.  I backed up the remaining files I had planned on, shut down the old laptop, and was able to get it out of the way.

I downloaded the Windows client on the new laptop and installed it.  When installation was complete, I took a moment to pause and reconfigure a few things.  As I plan to partially expose the ownCloud instance to the Internet and have it accessible from my smartphone, one of my first goals/low hanging fruit items for protecting it from a large chunk of port scans, hacks, and exploits is to change the web service to run on a non-default port number.  I could simply do this externally, but then I would have to change my client settings whenever I was on my wifi connection.  So instead I referenced changing the port number in Apache.  I’ve done this a few times in the past, but I decided I would like to also maintain the ability to serve some pages on the standard HTTP port if I so decided later.  I edited /etc/apache2/ports.conf and added an entry for my non-SSL port directly below the “Listen 80” directive, and for my SSL ports within the <IfModule mod_ssl.c> and <IfModule mod_gnutls.c> sections below the “Listen 443” directives in each of those sections.  Rather than edit the “default” site file, I created a new site file at /etc/apache2/sites-available/owncloud, similar to the following.  The port numbers and DNS names referenced are purposefully invalid as I’m not trying to create a honeypot; modify them appropriately for your configuration.

        #unfortunately this isn't pasting correctly, so parts are missing.
        #Too late in the day for me to fix right now.
        ServerName owncloud.example.com
        DocumentRoot /var/www/owncloud
        ServerAdmin me@example.com

                Options Indexes FollowSymLinks MultiViews
                AllowOverride None
                Order allow,deny
                allow from all

        #ScriptAlias /cgi-bin/ /usr/lib/cgi-bin/
        #<Directory "/usr/lib/cgi-bin">
                #AllowOverride None
                #Options +ExecCGI -MultiViews +SymLinksIfOwnerMatch
                #Order allow,deny
                #Allow from all
        #

        ErrorLog ${APACHE_LOG_DIR}/ownclouderror.log

        # Possible values include: debug, info, notice, warn, error, crit,
        # alert, emerg.
        LogLevel warn

In the future I will also be creating an owncloud-ssl file in the same directory. This will definitely happen before I configure any phone synchronization over the public Internet.  After restarting the apache service, I was able to access the ownCloud instance via http://owncloud_ip:newport#.  I have a bit of DNS work to do on my router to make the naming work universally, from the Internet or my LAN.  May document it up if there is any interest.  I would have to say this install was pretty slick and that I’m likely to pay for the client for my Android.
1 Comment. Join the Conversation

Infrared/Remote control related stuff

Posted September 17, 2013 By Landis V

https://sites.google.com/site/jsrsprojects/ – Specifically AndroidIR, but looks like some other interesting posts to check out, time permitting.

http://hackaday.com/2011/09/29/prototyping-a-bluetooth-to-ir-remote-control-translator/ – link to the above article, plus links to a few related posts.

The Logitech Harmony Hub and Harmony Smart Control are essentially pre-built, ready-to-use alternatives to the DIY models noted above.

Be the first to comment

Multi-IR remote

Posted September 1, 2013 By Landis V

This, possibly in combination with this (or at least the software component thereof), might be a simpler solution to something I was thinking about today.  I have an XBMC remote control application on my phone and tablets which I like for several reasons.  It’s always handy and never lost – or at least easily found – are among the top of these.  This got me thinking about running an IP-to-IR remote so I could leave an IR transmitter in some fixed location always pointed at remote controlled electronic devices, and just use my always handy Android to manage channels on all the devices.  As an added bonus, the webmote software might provide an option to integrate all the remotes into one single control interface rather than needing different remotes for TV, DVD player, surround sound, and XBMC.

My original thought was just to figure out a way to integrate a USB port on an existing remote control and basically trigger the sending of the commands, but this would probably be more universal and likely much less thought and work intensive.

I found ATmega 88’s here for around $3 each, but haven’t reviewed the full parts list yet.

Be the first to comment

New Pogo units

Posted August 12, 2013 By Landis V

Received the two bargain PogoPlug devices I had ordered from Adorama for $14.99 each the other day, and at unboxing it initially appears they may be the more desirable E02 models as opposed to the Oxnas P21 units they were indicated to be on the product page and that I recently linked instructions on a hack for. Last time I ordered one of the Pogo units something similar happened and I also received an E02 device which was fairly easy to load an alternate OS image on (though I didn’t do a great job with getting that project completed), but it seems to be pretty hard to tell what you actually have with the Pogo units until you actually boot them up and get a chance to look aft the environment (short of physically opening the chassis).

8/12 – Initial Setup and Testing

I first configured the MAC addresses on my Pogo units in the DHCP configuration on my Asus router with Tomato firmware so I’d have a good reference as to where and what they were going forward (there’s a good chance they will come and go on my network over time, and it’s always nice to be able to look at my lease table and know what’s what). I’ve been meaning to take some power draw measurements on these units for awhile now, as I have some curiosity as to whether I might be able to power them from a solar cell or cells.  To test this, I connected the ethernet cable to the first of my Pogo units and then plugged it into my Kill-A-Watt device.  Utilization seems to be fairly steady around 5.0-5.3 watts just sitting idly after booting with only the ethernet cable connected.  Adding a USB flash drive brings the draw up to 5.4-5.8 watts.  Finally, the Encore ENUWI-G2 wireless USB dongle I have brings it up to 6.0-6.1 watts (before loading an OS that will support it, so this value may change).  I will leave the Kill-A-Watt connected as I continue and try to document some readings after connecting a USB drive, wireless USB device, and putting the unit under some load. My next step was to access the device via SSH.  As noted in my earlier post, there are some instructions for this at http://archlinuxarm.org/platforms/armv5/pogoplug-v2-pinkgray.  I had to enable SSH access via the my.pogoplug.com site as I was not able to log in directly, but that was fairly straightforward to do.

8/14 Getting back to it

After getting SSH enabled and SSH’ing to the device, my intent was to load Debian Wheezy, as I’m a bit more familiar with the Debian package management and structure.  Please be advised that the notes below are not yet complete, as I am currently working through them. Update uBoot on your DockStar, GoFlex, or PogoPlug NAS – I did this, answered “yes” to the prompt to disable pogoplug services.  The installer recognized the device as a 2097 (Shevaplug), but this appears to be correct at least until a kernel that is patched for the E02’s is applied.  Just as Jeff’s instructions at the above page show, here’s what I ran:

cd /tmp wget
http://projects.doozan.com/uboot/install_uboot_mtd0.sh
chmod +x install_uboot_mtd0.sh ./install_uboot_mtd0.sh

I then ran /usr/sbin/fw_printenv and recorded the output from the command for later reference in case I encounter a need for it. My next steps were to prepare the drive to receive bodhi’s kernel/rootfs package noted below.  To do so, I issued the commands from steps 4 through 7 of the instructions at archlinuxarm.com, as follows:

/usr/sbin/fw_setenv usb_rootfstype ext3
/sbin/fdisk /dev/sda
#responded to prompts with o, p, n, p, 1, accept defaults, w
wget http://archlinuxarm.org/os/pogoplug/mke2fs
chmod +x
mke2fs ./mke2fs -j /dev/sda1
mkdir usb
mount /dev/sda1 usb

I wanted to get netconsole working before going any further.  First I initiated a netcat listener on port 6666 on another box with MAC 00:16:6F:56:96:9E and IP .194 with nc -l -p 6666.  I then attempted to load the configfs and netconsole modules as indicated in the instructions, but was not able to locate modules.dep – so I assume will have to proceed with getting the updated kernel and rootfs loaded first. Linux kernel 3.9.11 Kirkwood package and rootfs, last updated July 26 2013 (as of the time of writing) The bz2 package was hosted on Dropbox and I had downloaded it to my PC, but thought it might work better to just grab direct.  I discovered that the native wget in the Pogo firmware wouldn’t handle the HTTPS it redirected to, so a bit of a dirty hack with a reference from here (one of the later ones that uses echo to apply the HTTP 200 OK header was required since I couldn’t stuff this information into the binary) allowed me to grab it using netcat since I didn’t have a webserver handy on the box I had downloaded it to.  I started the following on the box that held the Debian rootfs: while true; do { echo -e 'HTTP/1.1 200 OK\r\n'; cat Debian-3.9.11-kirkwood-tld-1-rootfs-bodhi.tar.bz2; } | nc -l -p 8080; done Then, from the Pogo SSH session, I executed wget http://download.host.ip.addr:8080/Debian-3.9.11-kirkwood-tld-1-rootfs-bodhi.tar.bz2 (from the root directory of the newly formatted flash drive). This ran through and downloaded the file properly, and once it completed it reported “stalled”, so I issued a Ctrl+D on the server end and the connection terminated properly, with the file appearing to match according to an MD5 checksum. I then untar’ed the file on the Pogo with a tar -xjf Debian-3.9.11-kirkwood-tld-1-rootfs-bodhi.tar.bz2. This took a couple of minutes to complete, and unfortunately I didn’t think to check my power draw until it completed and was back down to ~6.3 watts.  Once complete I edited the fstab file and set the /dev/root type to ext3.  Finally, I issued a sync and /sbin/reboot and waited for the device to come back online.  I could tell when it did, as the front LED came up orange (due to the hardware reference to the Sheva, mentioned previously).  Unfortunately I wasn’t able to ping or SSH to it, so I gave it a hard power cycle and also cleared its DHCP lease from my router.  Pings replied when it came back up following the hard boot, and I also noticed that the front LED had come up green, which made me wonder if the hardware ID had been updated automatically. After removing the cached fingerprint from my SSH known hosts file, I was able to SSH to the Pogo and log in with username root and the default password of root, which I changed.  I then configured my regular user account as I normally do.  Upon checking fw_printenv, I see that the arcNumber is still showing as the Sheva 2097, as does a cat /proc/cpuinfo.  I ran across this thread which advised to issue a fw_setenv machid dd6, which I did followed by a sync and a reboot.  When things came back up, cat /proc/cpuinfo now shows the device as a Pogo E02.

Things to do:

Netconsole

Miscellaneous notes

/usr/sbin/fw_printenv output

ethact=egiga0 bootdelay=3 baudrate=115200 mainlineLinux=yes console=ttyS0,115200 led_init=green blinking led_exit=green off led_error=orange blinking mtdparts=mtdparts=orion_nand:1M(u-boot),4M(uImage),32M(rootfs),-(data) mtdids=nand0=orion_nand partition=nand0,2 stdin=serial stdout=serial stderr=serial rescue_installed=0 rescue_set_bootargs=setenv bootargs console=$console ubi.mtd=2 root=ubi0:rootfs ro rootfstype=ubifs $mtdparts $rescue_custom_params rescue_bootcmd=if test $rescue_installed -eq 1; then run rescue_set_bootargs; nand read.e 0x800000 0x100000 0x400000; bootm 0x800000; else run pogo_bootcmd; fi pogo_bootcmd=if fsload uboot-original-mtd0.kwb; then go 0x800200; fi force_rescue=0 force_rescue_bootcmd=if test $force_rescue -eq 1 || ext2load usb 0:1 0x1700000 /rescueme 1 || fatload usb 0:1 0x1700000 /rescueme.txt 1; then run rescue_bootcmd; fi ubifs_mtd=3 ubifs_set_bootargs=setenv bootargs console=$console ubi.mtd=$ubifs_mtd root=ubi0:rootfs rootfstype=ubifs $mtdparts $ubifs_custom_params ubifs_bootcmd=run ubifs_set_bootargs; if ubi part data && ubifsmount rootfs && ubifsload 0x800000 /boot/uImage && ubifsload 0x1100000 /boot/uInitrd; then bootm 0x800000 0x1100000; fi usb_scan=usb_scan_done=0;for scan in $usb_scan_list; do run usb_scan_$scan; if test $usb_scan_done -eq 0 && ext2load usb $usb 0x800000 /boot/uImage 1; then usb_scan_done=1; echo "Found bootable drive on usb $usb"; setenv usb_device $usb; setenv usb_root /dev/$dev; fi; done usb_scan_list=1 2 3 4 usb_scan_1=usb=0:1 dev=sda1 usb_scan_2=usb=1:1 dev=sdb1 usb_scan_3=usb=2:1 dev=sdc1 usb_scan_4=usb=3:1 dev=sdd1 usb_init=run usb_scan usb_device=0:1 usb_root=/dev/sda1 usb_rootfstype=ext2 usb_rootdelay=10 usb_set_bootargs=setenv bootargs console=$console root=$usb_root rootdelay=$usb_rootdelay rootfstype=$usb_rootfstype $mtdparts $usb_custom_params usb_bootcmd=run usb_init; run usb_set_bootargs; run usb_boot usb_boot=mw 0x800000 0 1; ext2load usb $usb_device 0x800000 /boot/uImage; if ext2load usb $usb_device 0x1100000 /boot/uInitrd; then bootm 0x800000 0x1100000; else bootm 0x800000; fi bootcmd=usb start; run force_rescue_bootcmd; run ubifs_bootcmd; run usb_bootcmd; usb stop; run rescue_bootcmd; run pogo_bootcmd; reset ethaddr=00:25:31:04:XX:XX arcNumber=2097

2 Comments so far. Join the Conversation

Linux as AirPrint server | Simply Me

Posted July 26, 2013 By Landis V

http://blog.mornati.net/2011/09/28/linux-as-airprint-server/

AirPrint enabling non-AirPrint printers with Linux.

Be the first to comment

http://wiki.openwrt.org/toh/rosewill/rnx-n150rt

Detailed device information and internals

https://forum.openwrt.org/viewtopic.php?id=27128

Upgrading to 64MB RAM (thought I had posted this one previously, but didn’t see it).

Be the first to comment