Links Archive

http://www.dd-wrt.com/wiki/index.php/Default_internal_device_networks
http://wiki.openwrt.org/toh/asus/rt-n16#specific.configuration
http://www.christopherkois.com/?p=497

I had looked this (or something like it) up not that long ago as I wanted to do some VLAN trunking through my Asus RT-N16, and I managed to lose it before getting it implemented.  It took a little bit of digging, but I think this got me back to a good starting point at least.

My plan is to trunk several networks from my basement up to a manged switch upstairs, from which I will support a second WAN router for a test network as well as an internal 5GHz wireless network , and possibly some additional internal segmented networks.  I have quite some distance to go to accomplish this yet, but at least now I have the base reference to the physical/internal port mappings again.  That’s an hour and a half I won’t have to spend next time.

Be the first to comment

DIY Pin Lock Socket – Mr.Beer® Fans Forum

Posted January 25, 2014 By Landis V

http://www.mrbeerfans.com/ubbthreads/ubbthreads.php/topics/276496/DIY_Pin_Lock_Socket.html

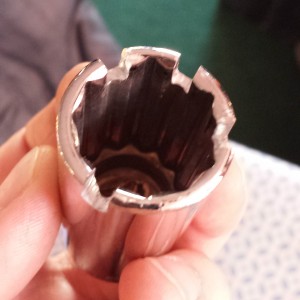
DIY post/pin socket for pin lock kegs.

DIY post/pin socket for pin lock kegs.

I was at Menards the other day and it crossed my mind that I needed make one of these so I could place the o-rings on my pin lock dip tubes.  I picked up a Mastercraft deep well 13/16″ socket, finally got around to cutting the slots in it today, and it works great.  My socket as it came out appears to the left, it took about 15 minutes with some very flimsy/lightweight cutoff wheels in my Dremel-like tool.

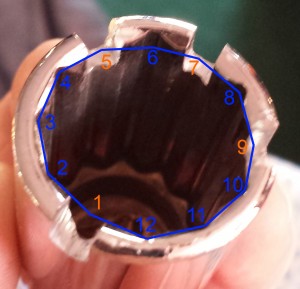
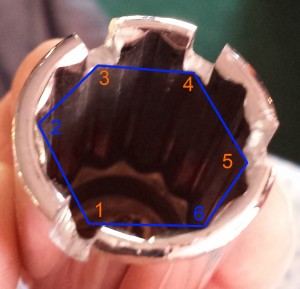
As I was looking at the picture, it occurred to me that it might save someone some time in the future if they could simply mark and cut rather than line up and mark the pins.  Pretty straightforward to do with either a six point or twelve point socket.  I’ve attached a couple of pictures below that show which of the points you’d need to cut for both a six and twelve point socket.

12pointsocketpinlock hexpinsocket

Be the first to comment

DIY Stir Plate Build

Posted January 25, 2014 By Landis V

I recently posted a link to a DIY stir plate build and needed to get started on my own list to keep track of supplies I have, supplies I need, and where I’m at in that task.  (Note:  As of 2/5, I completed this mostly with equipment I had on hand.)

Part List

List of parts and prices for the build.

  • 120mm Computer case fan
    • Had on hand, typically available for <$5 if you look (techbargains.com, slickdeals.net)
  • Erlenmeyer 2000ml flask
    • (Purchased) Amazon $14.25 (10-Jan-14)
  • Epoxy
    • JB Weld, had on hand, Menards $4.67/Amazon $6.64/Wal Mart $4.67
      • I was surprised to discover that this stuff apparently does actually contain steel.  While affixing the washer to my fan, I observed a small finger of the blended epoxy creeping out from under the washer and towards my magnet.  I’d suggest marking the position of your magnet(s) and centering based on your marks, and not attempting to assemble with the magnets in place.  Otherwise, you may find them epoxied in place!
  • Misc hardware (nuts/bolts/washers for table attachment/standoff)
    • Had on hand.  Used rubber anti-vibration pads that came with the case fan I replaced with the one I had on hand.  I just set the table on top of the fan on the side with the rubber pads protruding and approximately center it.
  • Neodymium/rare earth magnets
  • Stir bars
  • Table to support Erlenmeyer flask above fan
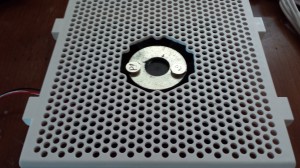
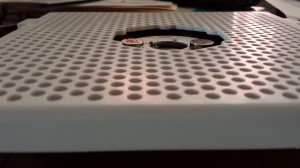
    • Had on hand/made from a ~10″ square piece of plastic, probably about 1/8″ thick, that came from one of those old lights that uses the heat from the bulb to turn an impeller (propeller? should look this up I guess) to cast a rotating image on walls/ceiling through a cellophane medium.
  • Washer (large)
    • Had on hand; if you don’t, less than a buck at the local hardware.
  • 12V Power supply
    • I had one of these on hand that already had a power switch, and had the quick wiring disconnects so I could just tie it right onto the red and black leads from my fan.
  • Potentiometer
    • I picked up a potentiometer from Radio Shack to allow me to control the speed, but I’m not sure I’m going to need it.

Build Process

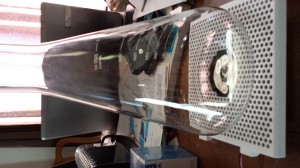
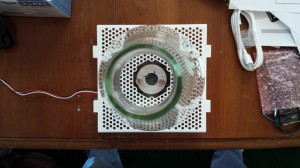
The build process is more or less as described in the original article I linked to.  I simply centered the large washer on the hub for my case fan and glued it in place with J-B Weld epoxy.  As I noted, J-B Weld does appear to actually contain some steel, so I recommend mounting the washer without having the magnets stuck to it.  Once the epoxy hardens, gently place the magnets on the washer approximately across from each other, spin the fan, and try to balance it as well as possible.  I found that you can place the stir bar across the magnets directly and it helps to visualize how well it will be centered above the fan hub, and ultimately how efficiently and quietly the stir plate will operate.

Below are a few build/post build pictures.
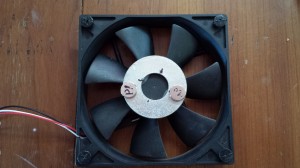
20140125_150610 20140125_150618 20140125_150701 20140125_150725 20140125_150910 20140125_150943

Video of initial test

Be the first to comment

About | Alpine Linux

Posted January 22, 2014 By Landis V

http://alpinelinux.org/about

Interesting build.  I have traditionally looked at Devil Linux in the past for firewall applications, but this may be another to check out.

Be the first to comment

http://tools.ietf.org/html/rfc5280

Be the first to comment

Antenna Pattern Data | Ubiquiti Networks, Inc.

Posted January 22, 2014 By Landis V

http://www.ubnt.com/support/patterndata

Useful for RadioMobile.

Be the first to comment

Removing “Smart Web Search” crapware from Firefox

Posted January 20, 2014 By Landis V

A relative recently had a problem with his computer, where any links he clicked from email messages in Outlook popped up the browser, but always to a “Smart Web Search” page.  When I initially heard of it, Google Chrome was getting the blame for the problem, but I was pretty sure it was just an issue with some crapware.  After he took it to someone in the Milwaukee area who charged $90 for claiming to fix it but did absolutely nothing towards taking care of the problem, I finally managed to get some time carved out to address it.  Thankfully I could remotely access the system via UltraVNC and see the problem, and it only took about five minutes to figure it out and get it corrected.  This link was the first I clicked when researching the problem, and disabling (and removing) the “Smart Web Search” crapware extension quickly got things back to normal.

Be the first to comment